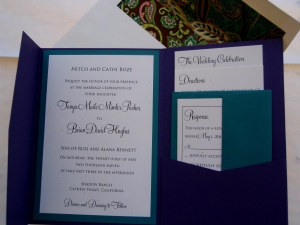
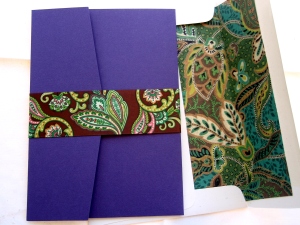
If you’ve looked at pocketfold invitations, you know how much they cost. I love stationary and pretty paper and there was no way that I was going to compromise and send out sub-standard invitations for my wedding. This project is VERY time consuming, but has great rewards. I have had several people tell me that they saved our wedding invitation, which is something they rarely ever do, and everyone raved at how nice it was. Of course we have ours saved in our wedding album along with other mementos from our wedding.
I purchased my paper materials from http://www.paperandmore.com . I looked around and they were the best value. Beforehand, I ordered plenty of samples to check out the different papers and colors and made a couple of mock invitations to see how they printed. I made my invitations on Microsoft Word 2007 and printed them off on my HP Deskjet.
These are the materials I used for this project:
— Computer, word processing program and printer (and lots of ink!)
— Paper cutter
— Ruler
— A-7 Pocketfold Invitation Cards (you can use the other sizes as well, but will need to modify paper sizes)
— Heavy card stock (80#) (for the mat)
— Text paper (70#) (for the invitation and inserts)
— A-7 Envelopes (outer envelope)
— 4 Bar Envelopes (RSVP envelope)
— Ribbon (for the “belly band”)
— Adhesive squares (I found photo mounting squares to be the easiest to use)
First, you will need to make your invitation. I practiced this for quite a while before getting it the way I wanted it. I initially was going to use Art Nouveau fonts, but found them to be a little hard to read (I was considering our elderly guests in that quotient), but instead used my favorite font (FeelScript) and TrajanPro. Both go well together and are classic, easy-to-read font styles.
To make my invitation, I put my page layout to “landscape” and made two columns, adjusting the margins and centering the text. It will take some time to get this right, but practice makes perfect! My margins were set at 1″ for every side on each column. I also read a lot about invitation wording and etiquette beforehand and looked at different examples I found online. If you have a problem with making your invitation, I suggest the website: http://www.downloadandprint.com — there are mahy different design templates and some are available to download for free.
After designing my invitation, I worked on the inserts. I had three in my invitations == 1. an explanation of our theme, events,location and our wedding website; 2. Directions; and 3. RSVP card. I used the same fonts for the inserts as the invitation to make it pleasing to the eye. For insert #1 I made my document with three columns and the top, left and right margins at .25″, with the bottom being .5″. I have a heading on the top with my script font so that it will show like a tab when the inserts are all in my pocketfold. Insert #2 also has three columns and the same margins as #1, but I ensured that I didn’t fill up the entire column as this insert needs to be smaller than the first in order to lay right. BTW: I suggest copying and pasting your text info on each of these so that they’re all the same. For insert #3 I made a little box with the RSVP information and copied and pasted, fitting six on each page. I used the text paper for this, but I’d suggest a thicker weight paper for the RSVP.
My invitation has one mat (teal) against the backdrop of the pocketfold (purple), which makes it look like it has two mats. You could have more mats if you choose, but would need to adjust the size of your invitation. Also, if you are not having a mat and only an invitation against the pocketfold backdrop, I would suggest using a heavier weight paper than the text paper.
I cut my invitations and inserts to the following sizes using my paper cutter: (If you are using a different size pocketfold, you’ll have to adjust the sizes.)
— Invitation 4 1/4″ W x 6 1/4 L
— Mat 4 3/4″ W x 6 3/4″ L
— Insert #1 3 1/4″ W x 6 3/4″ L
— Insert #2 3 1/4″ W x 6″ L
— Insert #3 3 1/4″ W x 3 1/2″ L
I have seen tutorials on how to construct your own pocketfold, but found that too be too time consuming and not as professional and nice looking as buying your pocketfolds.
For cutting out the invites, I suggest doing these in parts and on different days so that you don’t stress yourself out and make them messy looking. I cut and constructed my invitations without any help as I’m a perfectionist, but my husband helped out when we made our announcements (which were similar but without the inserts).
After cutting the invitations and inserts, I affixed the invitation paper to the mat, ensuring that it was centered properly and looked nice. You could use a ruler for this. I used photo mounting squares (bought in the scrapbook section at Michaels) as I found them to work the best. Some people use paste or sticky adhesive dots, but these are better in my opinion. I then mounted the invitation and mat to the center section of the pocketfold. Then I lined up my inserts, placing in the pocket with the RSVP card set inside it’s envelope and placed in front of the other inserts. I also put an engagement photo in with each one of our invitations.
I had also initially made envelope liners for my invitations, but found that to be way too much work and only sent those out with a few of my invitations.
I looked at and tried different methods of “tying” the pocketfolds closed and came up with using satin ribbon as the “belly band” and closing the ends with an adhesive dot. I went the extra mile on mine and made little matted tags with our guests’ names and put them in the center of the ribbon band with an adhesive dot. This also worked well to hide the cuts of the ribbon where they were affixed together.
I bought a custom Art Deco stamp on etsy which I then stamped on the back of the sealed envelopes and used my calligraphy skills to address them. I also used vintage style address labels that I purchased from Victorian Trading Co. which completed my look. FYI: These invitations will cost more to send out. Mine were 64 cents a piece and if you have more inserts and/or use heavier papers they may cost more. The USPS has a nice wedding cake 64 cent stamp, which is the one that I used for my invitations. You could also buy different stamps that go along with your theme and combine them.
Make sure that you keep a copy of your invitation for yourself!


